Office Remodel - Day 6
Big day. Once the Easy Mat acoustical flooring was flattened out, the sub-floor had to be primed with a special glue that comes with the mat. SPF painted the floor in the early morning so that the glue would get tacky and affix to the wood before we put the Easy Mat down. Painting the whole surface didn't take too long.

Though, of course, it was important that we mark our territory. So to speak.

Once the whole floor was painted, the purple color of the glue started to fade as the glue dried. Still shiny and fantastic! It's a weird process, but very effective.

Once the glue dried, the mat has a sticky backing that is removed and the glue and sticky back cling together for dear life. SPF cut the mat and fitted it perfectly around each corner of the door and along our ridiculously un-square walls. Notice his acoustical prowess, the mat doesn't go all the way to the wall to prevent additional unwanted sound transmission. :)

SPF followed the instructions on the mat, which included details about how to lay the mat out, cut it to size, and then hold it in place while you cut part of the sticky backing paper off . . .

. . . peel it back and reveal the sticky backing and then smooth it down in place.

You then repeat the process with the remainder of the mat, which is at this point sturdily held in place on the one side and slips neatly into place on the other.

The piece is cut slightly longer than necessary and cut to fit at the last second, once everything is down, so that you can be certain that all cuts are perfect for where the mat will end up.

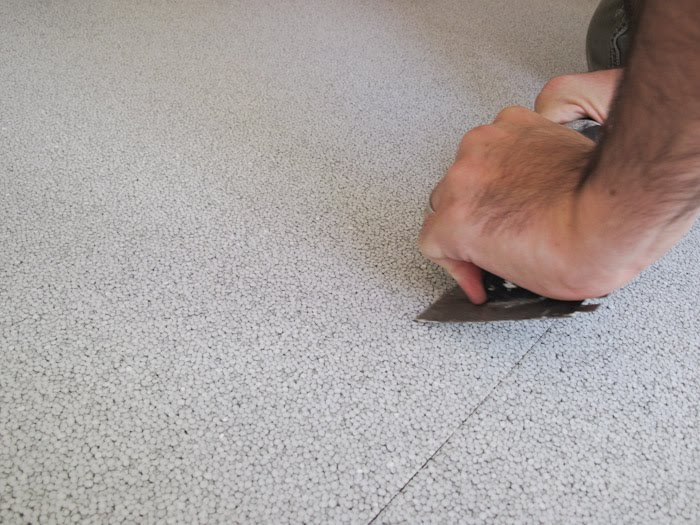
Once in place, you scrape along the surface to get any bubbles out of the glue/backing joint and ensure solid contact for the entire mat onto the floor surface.
Perfect. (He's very meticulous.)

While the Easy Mat was drying and sticking and doing it's thing, we started to talk about how we wanted the tile to align on the floor. Where you place your first tile dictates everything else about the floor, so we wanted to be sure that it was perfectly laid. We measured the existing linoleum faux tiles, measured the new tiles, accounted for grout lines, spacing from the wall, and the unfortunate lack of squareness of every surface in our house to try and determine the best possible location for the first tile as well as it's perceptual square. We determined that by measuring the length of the kitchen and office and finding the ideal line down "the middle" which is fairly loosely defined by cabinets and appliances. Once that was accomplished, we marked the center line for each side of the tile so that it would be "square" as well as aligned according to our visual preference. (Notice the difference between the linoleum and the Easy Mat.)

We then laid out tiles until we found six that we believed would make up the best center floor. (All of these will be uncut tiles, so how they look next to each other matters.) We traded several out, changed the orientation of the tiles so that they worked well together, dropped one (or two) accidentally and had to swap them out, but ultimately came up with six perfect tiles.

Using our marks, we drew out the perfect level lines for the tile so that we had something larger than a little red arrow to define our placement. Once that was done, we started the mortar process, first taking a small bit of mortar and working it around the area to burn in the top of the Easy Mat and create an ideal surface for mortar to mortar to tile joining.

The burning in process.

Once that's done, all we have to do is apply fresh mortar over the burned in square with the appropriate trowel and we are ready to place our first tile. We were careful not to completely obliterate our red lines so that we would know where to place the tile. We aligned the first tile (with marks of its own on the center point of each side) with the red lines and the floor alignment was set.

From there, placing the rest of the six was quick work. Mortar for burning in, mortar with the trowel, place the tile, place the spacers, repeat.

The tile was going to well, that in the midst of this I decided to start painting the walls. Maybe not the best idea seeing as how you can't put weight on the tiles until the mortar has cured. So I got a decent start with the edging, but not much more until I could no longer use the stool I was standing on to reach the high places.

But the edging is the hardest part. And that was already complete.

So I tiptoed around the rest of the tiles and painted everything that I could reach. If you look closely, you can see that I couldn't reach the middle portion above the door or some of the other edges. But, considering my constraints, I actually got a lot accomplished. And I proved my exquisite balancing skills.

You'll also notice that, at the beginning of this blog, it was early morning, and at the end, late, late at night. We closed up the paint bucket, cleaned up the materials, and crashed on the couch until we convinced ourselves to try and go downstairs to bed.
posted by Moose Tucker @ 9:49 AM
0 comments
![]()


