Saturday, August 28, 2010

Six Years Ago Today

As I am waiting for the stain and polyurethane to dry I thought I would see where I was six years ago today, the first August 28th post I had available on this blog.

This is fascinating. (Click the "see original post" link.)

Guess I got back around to photography and writing after all.

Office Remodel - Day 2

The office saw less progress on this particular day as we were waiting for the joint compound to fully dry before applying the primer. A couple of missed spots were caught and refinished so that we could have smooth, beautiful walls. Compare this image to the one from Office Remodel - Day 1, where the joint compound has been applied but is still wet. Even without the primer, these walls are starting to look fantastic!


My new office is going to be bright, airy, and lovely. My current office opens out onto the very busy and very loud street, whereas this door opens onto my courtyard garden. I'm very excited to be able to open the door and have a quiet breeze as well as look onto my flowers. I think the cats will also enjoy sitting with me as I work, but not be so worried that I am boring them because they have a wide array of lizards, birds, and bugs to keep their attention from this spot. At least, Isis seems to think so.

Refinishing Our Kitchen Cabinets - Day 3

Even though I have trouble finding the time to write about our progress, I assure you that it continues on a nearly daily basis. I am trying my best to document the progress both in images and words to share with you.

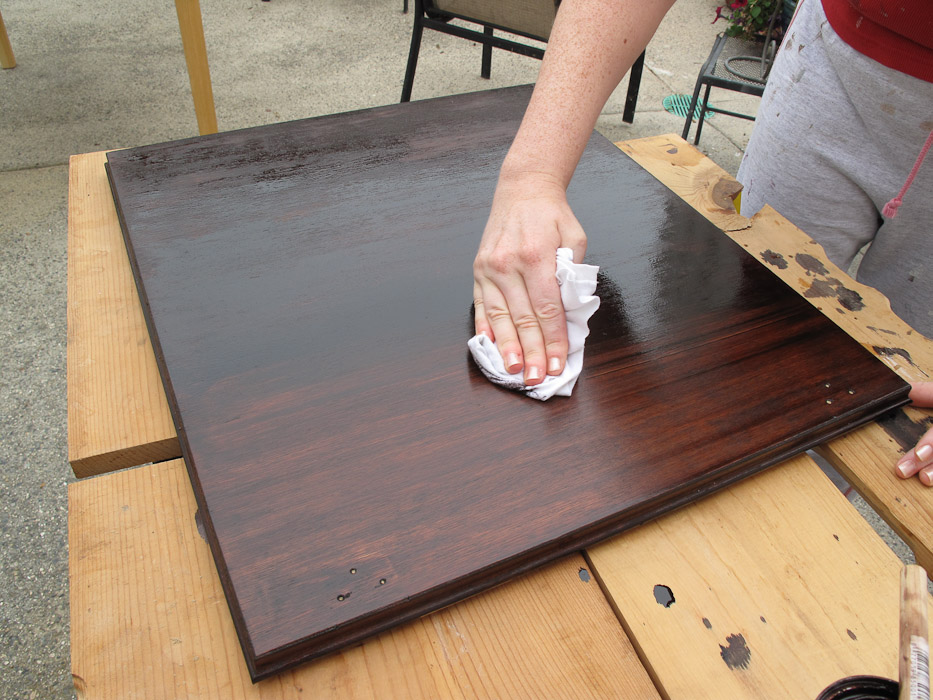
After the first group of cabinets was stained, I started the process of applying the requisite three coats of polyurethane that are necessary to protect the cabinets from the hazards of the kitchen - grimy fingers, splattering oils and sauces, or the inevitable cookie dough slinging off of a beater as it is too hastily removed from the mixing bowl.

This polyurethane is straight from the can Satin finish. We applied semi-gloss on the back of the tester door and weren't happy with how reflective it was, so we opted instead for the satin. It is still a little bit too shiny for our tastes, but bear in mind that we have not yet completed the finish, this is just another stage.


As we also determined that, to lay the tile in the office and the kitchen, we needed to finish the cabinet boxes as soon as possible in the two places that the boxes go down to the floor, I started to strip the boxes and begin the refinishing process in a vertical manner while the polyurethane of the previous step was curing.

You can see in this image a stripped cabinet door leaning against the as of yet unstripped cabinet box. You see where the cat is poking her nose that particular part of the cabinet comes into contact with the floor, so, to protect the future tile, the stripper, stain, and clear coat will all be applied prior to floor installation. As for the other cabinets, they can be refinished with the use of a canvas drop cloth on top of a plastic sheeting. (The stripper has an unsettling way of eating through just the plastic, so I'd rather double up on these.)


As I am not stripping all of the boxes at one time, but rather just the two areas that come into contact with the floor, I stripped beyond the boundaries of the area that I am going to refinish to ensure that when I come back and strip these areas in the future, I won't accidentally go too far and strip my new stained and finished areas. It may seem like a better idea to finish the boxes all at once, but so long as I have a defining edge where I can stop the stripper, stain, and clear coat, I can do them in stages. I would need a solid block of time to strip them all at once, and I just don't have that at the moment.


This is sort of awkward lighting, but you can kind of see the stripper starting to work on the front piece and side piece of the box, though only the front piece will be stained in this go around. The other piece will have to wait until that particular box set is stripped at a later time.


I still think we can handle this. We haven't run into anything yet that we haven't conquered, though the fumes are something to behold. Don't worry, we are taking all necessary safety precautions. Which I am particularly happy about at the moment, as my safety goggles have a drip of stripped plastic down the middle of the left lens. I could be a fancy scarred pirate lady now, but I think I prefer my photographer's eyes.

Tips of the day: ventilate, cover your fleshy parts, honest-to-god safety goggles, protective gloves, and a fume mask. Done.

Labels: ,

Sunday, August 22, 2010

Office Remodel - Day 1

Soooooo . . . you know how you start a project to do one thing and then, all of a sudden, you realize that you just got in over your head? Because, for instance, the cabinet job that you started led you to remove some base board (which, no to pick, is actually just poorly applied quarter round) in order to get access to the full depth of the wood cabinetry for staining and realize that the baseboard was holding down the crappy linoleum? Like, it was the only thing holding down the crappy linoleum.

So, our linoleum is coming up. We had a choice to make: ignore the linoleum or replace it. Seeing as how we are, very soon, going to be receiving the 1940's bedroom set from SPFs grandmother we decided to refinish the floor, because we are going to be moving my office (you remember my new office?) upstairs into the nook between the kitchen and the courtyard. We are going to have an official spare bedroom and (hopefully at some point in the future) a room for a little one. So, why not get the new office up to speed right away?

So, like we have done before, our one project has turned into two, and our kitchen cabinet project may be turning into the kitchen project. More to follow.

The original problem begins:


The office without the horrid baseboard. (In this case, the 'baseboard' was actually chair rail. So it wasn't really doing anything at all. We have hated those stupid crappy boards since we moved in. So it is kind of awesome to be getting rid of them. :)


The other side of the office. (Notice how the pantry has no doors!) It isn't a huge space, but all of my office furniture will barely fit and then we will have a fabulous spare bedroom and I will have a nice little office that is all my own.


Removing the baseboards also led us to the realization that the walls hadn't been finished to the ground initially, so we have to refinish the walls as well. Dang.


Of course, there were other problems with these walls, so this isn't the worst consequence. So now, I will have a beautiful new office with new walls, paint, and tile.


SPF putting new joint compound on the walls. They will be a completely smooth finish, which is exactly what I wanted! Thanks you, dearest. :)


The wall with new joint compound, drying.


We can handle it.

Refinishing Our Kitchen Cabinets - Day 2

Day 2 has us already well under way with the new project. The initial set of cabinets has been stripped, cleaned with mineral spirits, and sanded at this point. (We are doing the doors in stages for lack of space. Even though we can do a bunch at once in the courtyard, turns out that I don't want tons of tiny bug corpses stuck to my new stain. Lesson learned.)

This cabinet is prepped and ready for the next step!


This is the new stain color for the cabinets. Minwax Red Mahogany 225 oil-based stain. This is the first coat. It's rich, lovely, beautiful, and exactly what we want!!


After the cabinet is stained and we wait for five minutes, we pull off the excess stain with a clean rag and make sure that the stain has been applied evenly. It is pretty easy and fun, though messy, and we have gone through a lot of rags. Which is good, because we had a lot of rags and we prefer to get rid of things in a functional use as opposed to hold onto things as pack rats. Our intention is to reduce where possible, and find uses for everything else. We are currently working through years of accumulated fancy bath soaps, lotions, loofahs (I had a strangely large supply of these), spices, ingredients, supplements, etc. Less is more, especially when something that we no longer want can be re-purposed to be useful.

Labels: ,

Friday, August 20, 2010

Refinishing Our Kitchen Cabinets - Day 1

We have decided to start another remodeling project. Yay! I think. Every time we start one of these projects we end up working very hard for months and months on end. The good thing is that every time we start a new project, we learn new skills. With the 1/2 bath we learned how to lay tile, move in-wall plumbing, reinstall a toilet, fix drywall, and apply one kind of texturing. (We already knew how to prime and paint.) With the master bath we learned how to install wall tiles, lay concrete, install a closet, and apply a different kind of texturing. This time around, we chose to learn how to refinish wood cabinetry, which has proven to take more patience and attention to detail than any of our other projects.

To make sure that I could actually do this before we started the whole kitchen, I took down one door that is rarely opened and stripped, stained, and finished just the back. The logic was, if I couldn't manage it, I could strip it again and stain it to match the original without too much trouble. It worked, so we decided to give it a try.

So, here we go.

As always, we need to have a starting image. This is the state of our kitchen as it has always been. For 30 years. We never liked pretty much any of it, but always thought that it would be extremely difficult and expensive to update. Well, it will be difficult, but it is not going to be as expensive as we thought. So long as we do it ourselves.

Day 1 - Before anything.


This is what the back of the doors look like to begin with. Notice that the installers placed the hardware on the unfinished doors before spraying on the varnish. Lazy. So many issues with our kitchen that can be directly related to the original manufacture or the homeowners that directly preceded us. We're not fans of either of them. Also notice the color. That sort of amber, high gloss finish we really don't like. The whole design of the kitchen is very dated.


So this is stage one. The stripper. It is incredibly toxic stuff that burns a lot if you drop it on your toes. Don't worry, I didn't drop it on my toes. It was my leg. And my leg is fine. It works like a charm, though, and basically liquifies the entire surface of the cabinet - anything that isn't wood.


Once the stripper does its job, you scoop it off with a plastic palette and then give the whole thing a mineral spirits bath with a steel wool loofa.


So, we have no idea how this will turn out in the end, but we have no choice but to keep going now! Stay tuned.

Labels: ,